| COMMERCIAL ENGINE STANDARD PRACTICES MANUAL | Dated: 06/05/2017 | |
| SPM 70-46-04 MIXING RESINS, ADHESIVES, AND POTTING COMPOUNDS | ||
| COMMERCIAL ENGINE STANDARD PRACTICES MANUAL | Dated: 06/05/2017 | |
| SPM 70-46-04 MIXING RESINS, ADHESIVES, AND POTTING COMPOUNDS | ||
| TASK 70-46-04-360-801 |
| 1 . | General. |
| A. | Scope. |
| (1) | This procedure describes the standard method for mixing resins, adhesives, and potting compounds. |
| B. | Purpose. |
| (1) | The purpose of this document is to provide a standard method for mixing resins, adhesives, and potting compounds. |
| (2) | The methods in this document are the same as those in ARP 5256 in order to achieve industry wide standardization of composite repair techniques. It is intended that ARP 5256 be one of a number of ARPs that will cover other aspects of the techniques required to perform composite repairs. This will provide a suite of available repair techniques that are acceptable for use throughout the commercial aircraft industry. These ARPs will be put into Standard Practices Manual as they become available and are approved. |
| (3) | The only changes will be the addition of GE consumable numbers to the materials described in generic form in the ARPs. Because all the sections of the ARP have been incorporated into this Standard Practice some sections are similar to Standard Practice Manual sections already in existence. These sections are referenced. |
| (4) | This Standard Practice shall be used for composite materials only. |
| (5) | For mixing of the Abradable Plastic Seal Compound (RSP-3) refer to TASK 70-43-15-360-001 (70-43-15, Abradable Plastic Seal Compound (RSP-3)). |
| C. | Applicable Documents. |
| The following publications form a part of this Standard Practice to the extent specified herein. The latest issue of all SAE Technical Reports shall apply. |
| (1) | SAE Publications. |
| Available from SAE. Refer to the List of Suppliers in step 4 of TASK 70-80-00-800-803 (70-80-00, Consumable Material Section). |
|
| (2) | Applicable References. |
|
| (3) | Standard Practices Manual References. |
|
| 2 . | Tools, Equipment, and Consumable Materials. |
| Subtask 70-46-04-350-001 |
| A. | General Environmental and Health Aspects. |
| General guidelines are given throughout this document regarding the relative hazards to the user and the environment from the materials and equipment listed. However, the user should obtain the Material Safety Data Sheet (MSDS) or equivalent from the supplier prior to using any of the materials. The relevant environmental health and safety organizations should be consulted regarding safe use of the materials. Material suppliers are also a good source of information for the safe use of their materials. |
| B. | Equipment. |
| (1) | The personal protective equipment required to safely handle a specific material is identified in the supplier's MSDS. |
| The areas of the body most likely to be affected when working with resins are the skin, eyes, and respiratory tract. Guidance is given on the kinds of personal protective equipment that may be required and typical uses. |
| Before using any type of personal protective equipment, training should be given to ensure that the equipment is used safely and correctly. |
| (a) | Exhaust System. |
| 1 | When mixing resins and adhesives in a shop environment, a fume cabinet with local extraction should be used. Control of the emissions shall be in accordance with local and national regulations. Local exhaust systems shall be capable of providing a good flow of fresh air to personnel. The system shall be air operated or use flameproof motors if it is to be used in areas where flammable vapors may be present. A local exhaust system may be used as a method of providing a safe environment keeping fume concentrations below the allowable limits in confined spaces where vapors may accumulate. |
| (b) | Eye Wash. |
| 1 | The eye wash facility shall conform to the local standards and shall be capable of hand free operation to allow the user to hold the eyelids open while operating the eye wash. Eye wash facilities shall be used if eyes are exposed to resin, hardener, fillers, milled fibers, cleaning materials, or solvents. |
| (c) | Gloves. |
| 1 | The gloves shall allow full hand dexterity and shall not be coated with any material that may contaminate the repair materials or repair area. |
| C. | Tools and Materials. |
| (1) | The basic tools and consumable materials that are used for resin mixing are identified below. |
| (a) | Tools. |
| 1 | Spatula: Clean spatulas are needed to transfer the resin and hardener to the mixing container and to mix the resin in the container. Typically, a metal spatula or a wooden tongue depressor is used. |
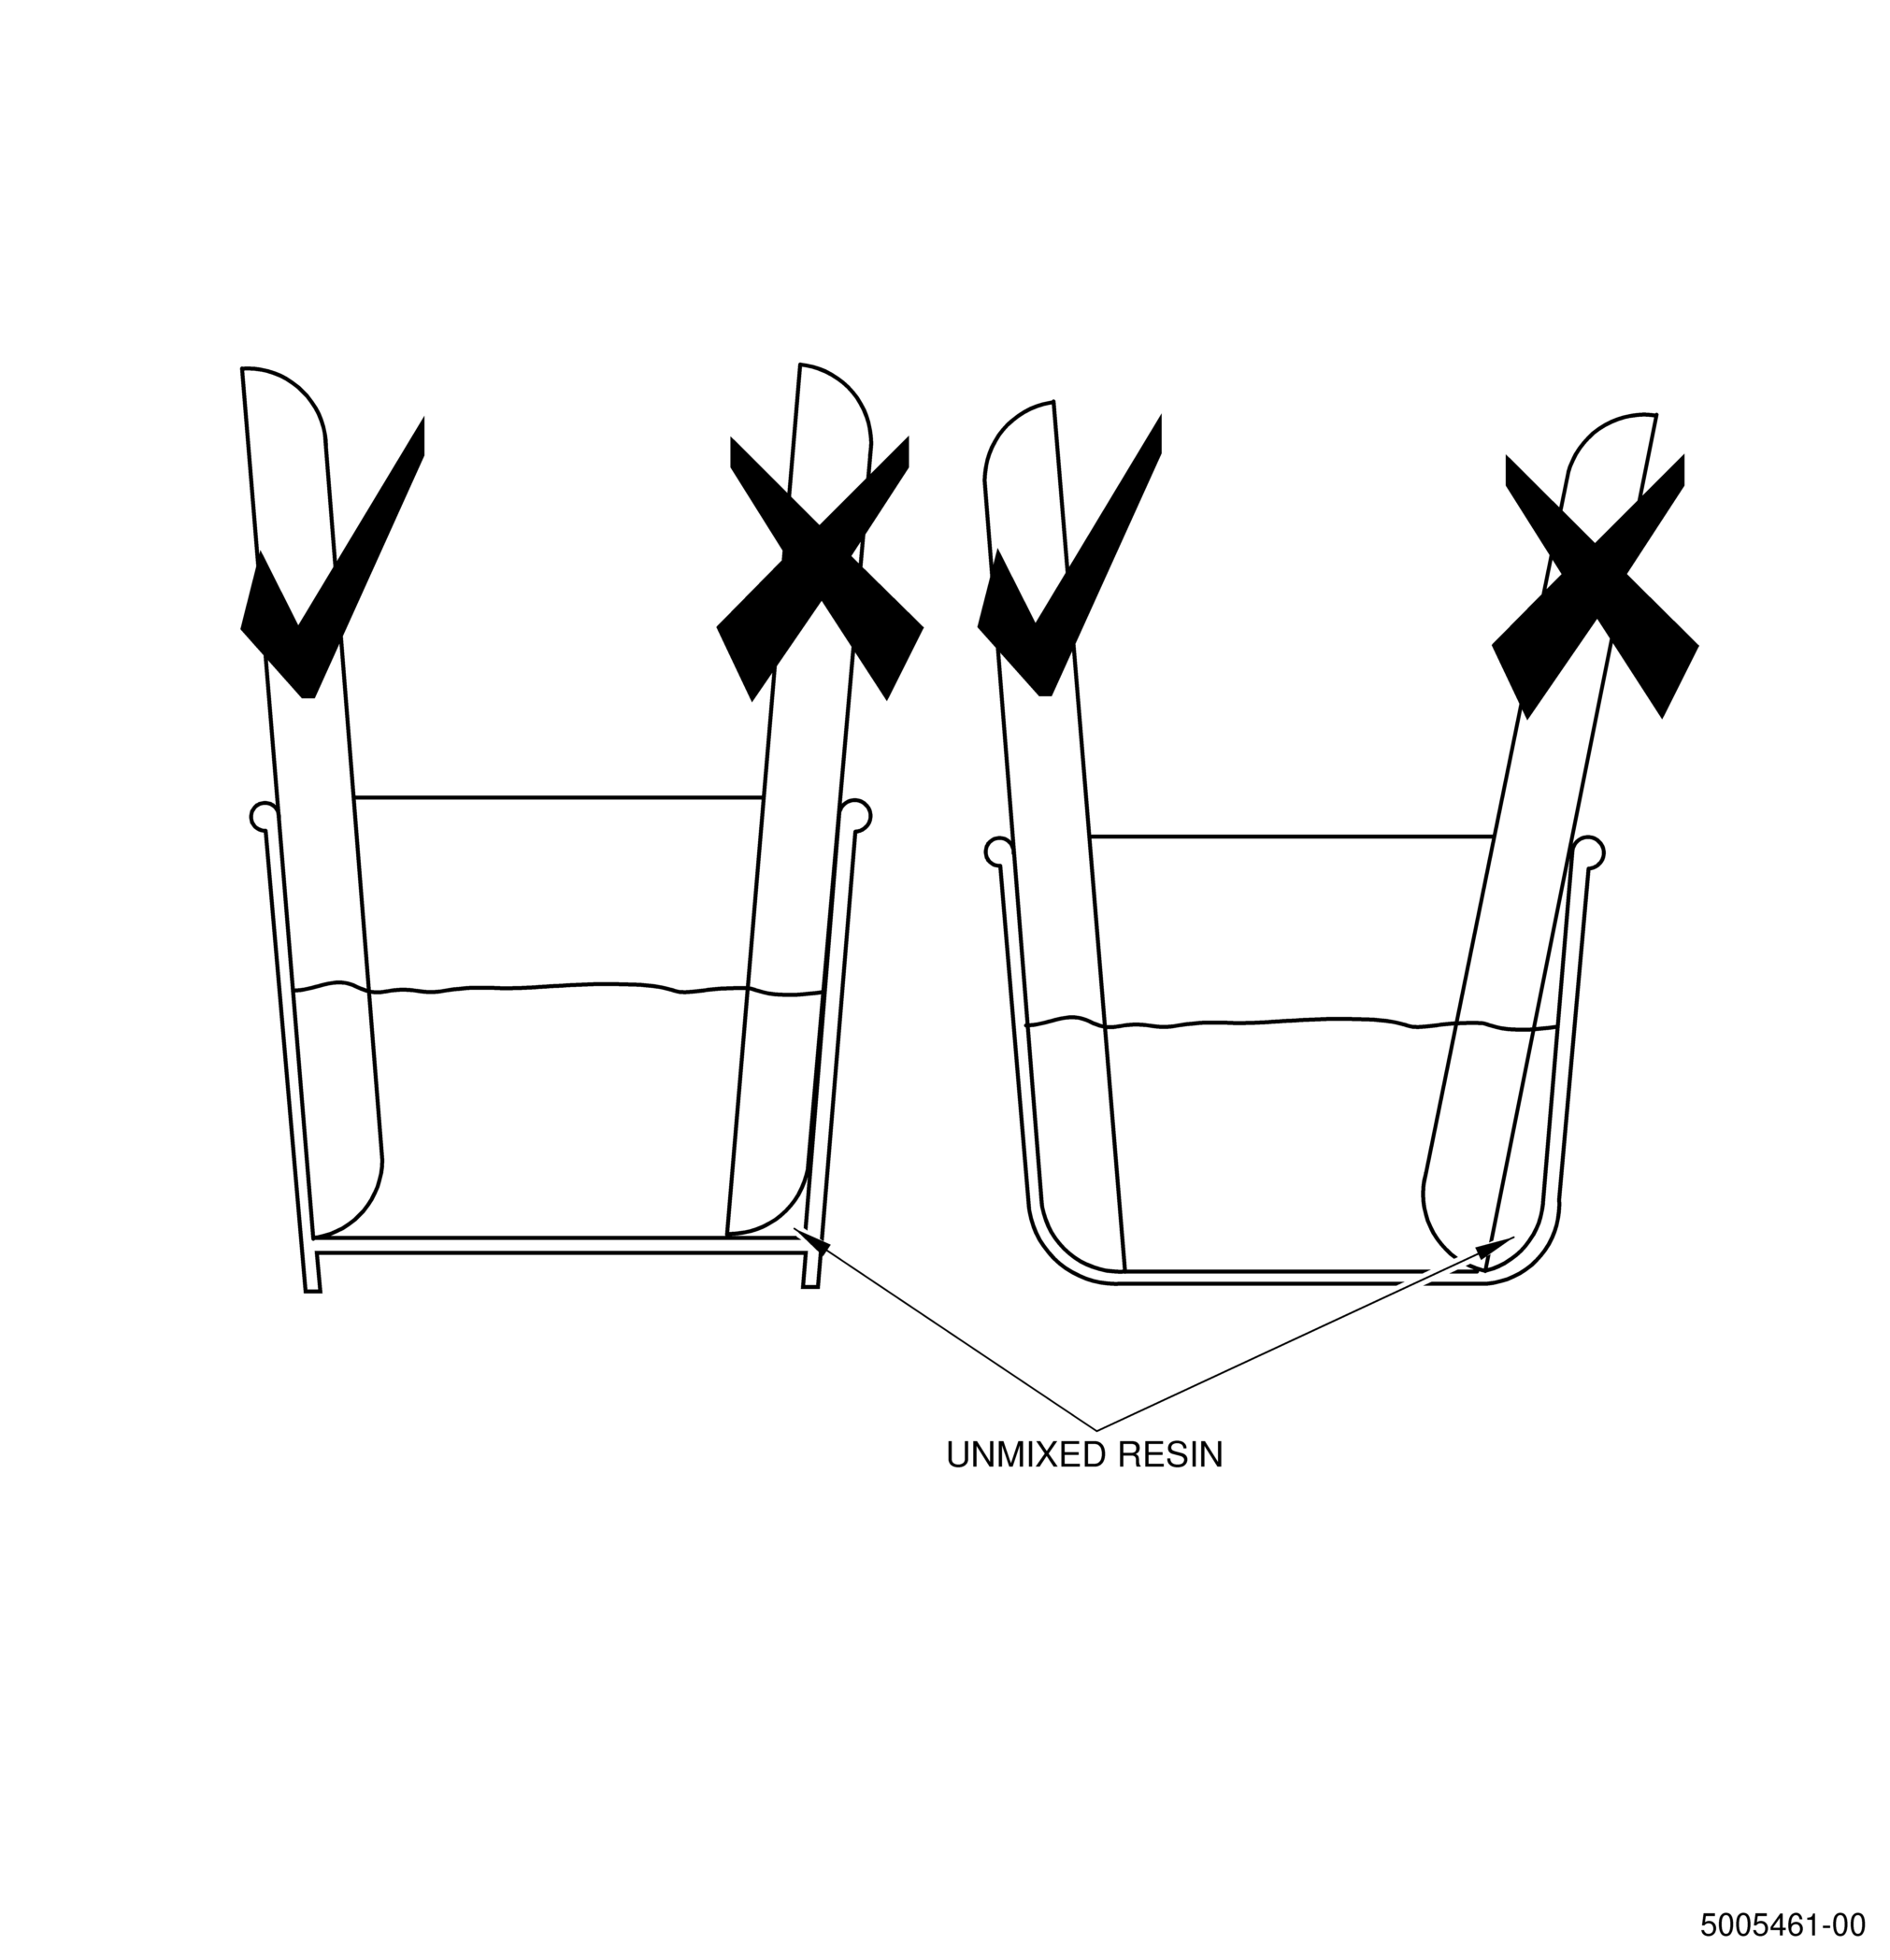
| Use separate spatulas for each resin component to prevent cross contamination. A single tongue depressor can be split in half length wise to make a spatula with a sharp end to get into corners better. Refer to Figure 1. |
| 2 | Spreader: (sometimes called a squeegee) A broad flexible spatula used to spread the mixed resin over a large area, for example to spread resin over fabric. |
| 3 | Scale: A scale is required to weigh the resin components. The scale may be electronic, triple beam or equal arm with a single beam. The accuracy must be better than 1 percent of the smallest amount being weighed, e.g., if the smallest amount of hardener to be weighed is 10 g, then the accuracy of the scale shall be 0.1 g. Spring scales shall not be used. A tare feature is useful in minimizing weighing errors by allowing the balance to be rezeroed after the container and each component are added. |
| (b) | Materials. |
| 1 | Container. |
| A clean container is needed to contain the resin during measuring and mixing. The recommended containers are translucent High Density Polyethylene (HDPE), glass, metal, coated paper, PTFE or polypropylene with a height to diameter ratio of one. The split tongue depressor shown in Figure 1 can be used with a rounded bottom container or a straight bottom container as shown in Figure 2. Make sure the spatula is able to scrape all unmixed resin from the sides and bottom of the container. The translucent sides allow the user to inspect for any unmixed resin. Metal containers with rust on the inside or wax coated paper should not be used. |
| 2 | Shallow Tray. |
| A shallow tray may be used to maximize the pot life when using large portions of mixed resin. The shallow tray must use the same material considerations as the mixing container or may be covered in Mylar or Nylon film. The recommended maximum resin depth in the tray is 0.25 inch (6.35 mm). |
| 3 | Resin Compounds and Additives. |
| Potting Compound: |
|
| Paste Adhesives: |
|
| Additives: |
|
| Microballoons: |
|
| Fumed Silica: |
|
| NOTE: |
|
| Powdered Aluminum: |
|
| Milled Fibers: |
|
| Chopped Fibers: |
|
| Fire Retardant Additives: |
|
| Resine Extenders: |
|
| CAUTION: |
|
| D. | Consumable Materials. |
| * Refer to the repair for these materials |
| 3 . | Procedure. |
| A. | General. |
| (1) | Repairs cured below 212 °F (100 °C) usually require the use of two part laminating resins, adhesives, and potting compounds. The two part systems are made up of a base resin and a hardener. The base resin and the hardener can be in paste or liquid form, and are always supplied in separate air tight containers. To aid mixing, some resins and hardeners have different colors. A homogeneous (uniform) mixture is an important factor for the quality of the bonding. |
| (2) | The resin and hardener should be stored in a cool dry environment. The storage temperature depends on the specific type of material. Some can be stored at room temperature while others require refrigeration at 40 °F (4 °C) or freezer storage at 0 °F (-18 °C). Refer to the manufacturers storage instructions and the procurement specification for the appropriate storage conditions. |
| (3) | Depending on the resin/adhesive viscosity and the application, a viscosity control additive might be needed. The resin/adhesive should be mixed first with the hardener before adding the viscosity control additive to have a homogeneous (uniform) mixture. |
| (4) | Some manufacturers have pre-measured kits such as Semkits or blister packs. These offer the advantage of not having to weigh each of the components, but the mixing procedure is just as important as non pre-measured kits. Several mixing machines are also available to assist in the mixing. Follow the manufacturers directions for the mixing procedures. Mixing or blending equipment should produce a smooth, workable mixture that is essentially free from lumps and entrapped air. |
| 4 . | Mixing |
| A. | General. |
| (1) | Always refer to the supplier data, unless otherwise directed by the repair, for information on: |
| (a) | Resin/hardener mixing ratio and tolerance. |
| (b) | Temperature range for application. |
| (c) | Pot life/gel time. |
| (d) | Cure schedule. |
| After mixing the resin and hardener the cure process starts. The cure process is an exothermic reaction which generates heat. If the environment can dissipate this heat then the pot-life is relatively long. The lack of heat dissipation, which results in a temperature increase of the mixture, can cause a very short pot-life, which can be a fire hazard. So be aware of the pot-life in relation to the resin mass and the wetted area of the mixture. |
| WARNING: |
|
| B. | Laminating Resin Quantity Determination. |
| (1) | General. |
| The following method determines the amount of laminating resin that is needed for the impregnation of dry fabric. This is general guidance and can vary depending on the efficiency of the user. Individual judgment should be used based on prior experience when available. For further understanding of this method an example is provided. |
| (a) | Determine the weight of dry fabric material that is required to be impregnated. This can be done by weighing the piece(s) of fabric or calculating the weight based on the fabric area and areal weight of the fabric. |
| (b) | The amount of resin needed for a typical wet lay-up is 50 percent by weight. Therefore the weight of the mixed resin should equal the weight of the fabric. It is recommended that an additional amount be added to the gross weight of the mixed resin to allow for transfer inefficiencies or other uses such as brush coating the laminate. Repairs may specify another ratio for certain applications, therefore always refer to the repair. |
| (c) | Determine the resin/hardener mixing ratio. Use the manufacturer’s information sheet for the appropriate mixing ratio, unless directed otherwise by the repair. |
| (d) | Determine the weight of the resin and the weight of the hardener. |
| EXAMPLE: A piece of fabric 20 inches x 10 inches is to be impregnated. Since most manufacturers specify their products in metric units, the area is converted to metric units. The conversion factor is 0.000645 m2/in2. The fabric area is: |
|
| Based on the fabric manufacturer’s data, the areal weight of the fabric is 320 g/m2. The weight of the fabric is: |
|
| Since the weight of the mixed resin should equal the weight of the fabric plus 20 percent (for example), the required amount of mixed resin is: |
|
| For this laminating resin the manufacturer specifies a resin/hardener mixing ratio of 100/25 parts by weight. The component portion is determined by multiplying the total mixed weight by the ratio of the component to the total. The weight for the component portions are: |
|
| C. | Adhesive Quantity Determination: |
| (1) | General. |
| The following method determines the amount of adhesive that is needed for a repair. This is general guidance and can vary depending on the efficiency of the user. Individual judgment should be used based on prior experience when available. For further understanding of this method an example is provided. |
| (a) | Determine the total bond area of the repair. This is the total area that will be covered with adhesive. |
| (b) | Determine the average bondline thickness for the repair. If a bondline thickness is not specified a typical thickness is 0.005 in (0.127 mm). |
| (c) | Determine the weight of the adhesive by calculating the adhesive volume multiplied by the adhesive density. It is recommended that an additional amount be added to the gross weight of the mixed adhesive to allow for transfer inefficiencies or other uses such as brush coating the laminate. Refer to the manufacturer’s information for the adhesive density. A typical density for an epoxy adhesive is 1.25 g/cm3. |
| (d) | Determine the resin/hardener mixing ratio. Use the manufacturer’s information sheet for the appropriate mixing ratio, unless directed otherwise by the repair. |
| (e) | Determine the weight of the resin and the weight of the hardener. |
| NOTE: |
|
| EXAMPLE: A 5 in x 10 in carbon/epoxy precured doubler is to be bonded to a skin. Since most manufacturers specify their products in metric units, the area is converted to metric units. The conversion factor is 6.45 cm2/in2. The bond area is: |
|
| A bondline thickness is not specified therefore a typical thickness of 0.005 in is used. The conversion factor from inches to centimeters is 2.54 cm/in. The adhesive volume is then calculated to be: |
|
| The manufacturer specifies that the density of the adhesive is 1.25 g/cm3. The weight of the mixed adhesive is then calculated and an additional 20 percent (for example) is added for inefficiencies. Therefore the required amount of mixed adhesive is: |
|
| The calculations determined that only 6.1 g of adhesive is needed for this repair. This is below the recommended minimum of 25 g, therefore 25 g will be mixed for this application. |
| For this adhesive, the manufacturer specifies an adhesive/hardener mixing ratio of 100/60 parts by weight. The component portion is determined by multiplying the total mixed weight by the ratio of the component to the total. The weight for the component portions are: |
|
| A general rule of thumb for a quick estimate of the amount of adhesive (in grams) required to be mixed for a bondline application is 0.125 times the area (in square inches). |
| D. | Resin, Adhesive and Potting Compound Mixing Method. |
| WARNING: |
|
| CAUTION: |
|
| CAUTION: |
|
| CAUTION: |
|
| NOTE: |
|
| NOTE: |
|
| (1) | Use separate clean, dry spatulas for each resin component to eliminate cross contamination of each component. Determine the required amount of resin/hardener to mix. Refer to the previous paragraphs for the calculation methods. |
| (2) | Weigh the resin in a clean, dry container large enough for mixing both components. If mixing is to be accomplished immediately, then weigh the hardener in the same container, if not, use a separate container. Do not exceed the mixing ratio tolerances specified by the manufacturer or the repair. |
| (3) | Mix the resin and hardener thoroughly using a spatula. Stir slowly to avoid mixing excessive air into the mixture. The resin is well mixed when the mixture has a uniform color and texture. Make sure that the material on the container walls is totally included in the mixture. Deaeration should be considered for high viscosity resin mixes. |
| (4) | Optional Step: If additives are to be used, add them to the mixture now. Mix thoroughly to ensure a uniform mixture. |
| (5) | Use the mixed resin directly after mixing. To increase the pot-life after mixing pour the resin into a shallow tray or on film. This prevents heat build-up thereby maximizing the pot-life. |